To help answer the question of why it takes so long to get an event recording on disc, even for small events, I’ve put together this high-level, high definition (720p) behind-the-scenes walkthrough of the post-production editing, mixing, mastering, replication and packaging processes used for the ahCOOTstic Rock event (and others) brought to you by the Phoenix Independent Musicians’ Project (PIMP Google Group) and Sonic Binge Records.
This do-it-yourself replicator features eight Lite-On CD/DVD burners. By flipping the disc over you can burn images onto the top using the drive lasers.
I’ve slowly updated components of The $1K Home Studio over the last few years, but have never had a low-cost, DIY solution for disc replication. After playing with external CD burners and evaluating various proprietary hardware options such as the Aleratec auto-flip burner , MicroBoard tower replicators amongst many others, I decided that the current commercial solutions are nice, but most definitely overpriced. So I decided to develop my own solution. This custom-built behemoth is built from common off-the-shelf (COTS) hardware from Fry’s Electronics and inexpensive commercial software. It costs less to own than commercially branded replicators, and also functions as a normal desktop computer since it runs Windows 7 and Linux. (I took care to also buy a Gigabyte-brand motherboard that supposedly supports the OSx86 (“hackintosh”) project, but have had little success with the installation.)
Hardware
Intel i5 750 64-bit CPU. (Features 4 cores.)
4GB RAM.
8 x (yes, eight) Lite-On CD/DVD 5.25″ SATA burner drives.
Gigabyte motherboard with lots of SATA ports.
Add-on SATA card. (Most motherboards won’t have enough connectors, especially if you have 8 x burners plus 4 x hard drives. 🙂 )
Big-ass power supply. (The first one I bought wouldn’t even boot the thing. I put in a monster and everything started working.)
Software
The point of all these burners is to burn simultaneously to all of them, but Windows 7 and OS X cannot do this out of the box. Only a small subset of CD/DVD burning software on the market supports parallel burning, and some only seems to support multiple burners for specific types of burns. What’s worked best for me so far is…
Nero Multimedia Suite 10 for concurrent audio and data burning with multiple burners. You don’t have a lot of easy-to-use alternatives here, and I’ve also noticed a few glitches with Nero. Keep your eye out for sales here and you can pick up a copy dirt cheap.
Acoustica CD/DVD Label Maker for concurrent LightScribe replication across multiple burners. Again, not a lot of options here. The free software from LightScribe.com does not support multiple burners, though some vendor-specific bundles seem to. (LaCie’s LightScribe software in particular appears to support simultaneous LightScribe burns, and they also have a Mac version. I would have went with a Mac-based solution, but 8 x USB 2.0 drives probably would not work so well.)
CDs burned with LightScribe technology. Discs come in many different colors.
I decided to create all my replicated discs using LightScribe technology. This allows me to flip LightScribe CD-Rs upside-down in the burner and use the laser to burn custom graphics onto the top of the disc. I also made the command decision to use COTS cd sleeves instead of CD Jewel cases or slimline cases. The plastic ones are more expensive, always crack, and are pretty much useless from the start since most people seem to rip their CDs nowadays anyway. Sleeves protect the disc, come in many colors, are far less expensive, even cheaper in bulk, and perhaps best of all can be printed on directly though ordinary laser and ink jet printer.
The system runs Windows and Ubuntu. Additional drives are interchanged using hot-swap SATA drive modules.
System Pros
Inexpensive initial fixed cost of hardware parts and software licenses.
Inexpensive variable cost per disc since LightScribe labeling uses the drive laser instead of ink. There are no costly consumables to replace. (Ordinary LightScribe media purchased in bulk works great.)
Quick data, audio and LightScribe replication using 8 concurrent burners.
Doable by anyone capable of building of PC with a little time can build one.
Functions beautifully as a normal desktop computer.
System Cons
Not completely automated like some commercial units because disc loading, unloading and flipping (if using LightScribe) is a manual process.
Still uses CD-Rs. These are not the same as commercially pressed mass media discs, but a lot cheaper.
(This one is only applicable to audio.) I’ve yet to find inexpensive parallel burning software that can handle DDP images. (The standard in “Red Book” audio CD mastering.)
Since LightScribe labeling uses the drive laser instead of ink, disc labels are grayscale only. (Note: You have a lot of options in disc color, though, so it’s not a big deal. Just use your creativity.)
Replication Process Overview
Label four empty CD pancakes to manage the assembly line replication process. If you don't you'll get your disc piles confused!
My primary purpose for this buildout is to replicate audio CDs as quickly as possible for Sonic Binge Records: the awesome music production company. In particular, I need to quickly replicate a pancakes worth (usually 25-50) of audio CDs as inexpensively as possible. After much trial and error with the process, this is what I’ve found works best.
Create final CD master image. (For me that’s using WaveBurner on a Mac. For replication purposes it doesn’t really matter as long as the master is good.)
Take four empty CD pancake containers and label them “Blank”, “Burned”, “Labeled”, and “Ready” to create an assembly line process. You can of course save these for future jobs.
Use Nero Burning ROM to replicate batches of 8 at a time. When they’re done, be sure to put them in the “Burned” stack so you don’t get burned discs confused with “Blank” discs.
While they’re burning, create a square grayscale graphic for LightScribe burning. (Free label creator software is available, though anything like Photoshop works too. I usually use a combination of Photoshop and Acoustica.)
Use Acoustica to label batches of 8 at a time. Each batch will take a while. Full-disc burns seems to take around 30 minutes per batch: much longer than the data/audio side of a standard CD-R. Moved discs to the “Ready” pile when they’re done. (Note: The “Labeled” pile is for discs that have been LightScribe labeled but not burned with data or audio. You can end up in this situation when using multiple computers to do burning.)
While they’re burning, use your favorite document application to design your printed CD sleeves. I’ve started buying color variety packs in bulk packs of 300 to keep options high and costs down.
Bulk print the entire order of sleeves in a single run. As long as you can set the size of the feeder tray, your existing feeder should work fine. (CAUTION: remember that the “window” is made of plastic, and can melt if exposed to heat. Think twice before trying your laser printer. 🙂 )
Take discs from your “Ready” pile (as they finish getting labeled) and slip them into sleeves to create the final product, suitable for general distribution. The imaging lasering adds a great, distinctive touch, and of course you can get as creative as you want with the sleeves, too.
Done! (aka beer time.)
Costs
Fixed: ~$1K for the machine build, with about $400 of that just for the burners. I reused/reposed parts from old junker machines where I could, and could have saved some money by buying online. I was in a rush and just went to the store.
Variable: Roughly $0.40 – $1.00 per disc, depending on the disc quality, packaging, ink etc. you decide to use for each project. (All things considered, the $0.40 version looks pretty decent!)
Closing Thoughts
If you’re a musician without computer skills I would not recommend attempting this project, but if you feel fairly comfortable putting together machines, it’s honestly not that hard. It’s just a PC, after all. (Disclaimer: I do have a degree in Computer Science and Engineering, so my perspective of “not that hard” may be a bit skewed.)
I hope you’ve found this rough how-to guide both inspirational and informative. It’s very useful to have a replication machine handy, and if you’re actively working with people on projects intend for distribution it’s a great investment!
Please use this comments section for all your general comments and questions and I’d be happy to address them. Thanks for reading!
You’d think iTunes 9 would have a menu option to convert selected, non-DRM’d files to .MP3, .AAC and such. It doesn’t, but there’s a quick–if not silly–workaround to get iTunes to covert your tracks to a supported format.
Mac instruction for iTunes v9
Open Preferences -> General -> Import Settings. Change the “Import Using option to the format to which you want to convert.
Within iTunes, select the file you want converted.
Under the “Advanced” menu, you should now see a “Create XYX Version”. Click it and your selected file(s) will be converted in the background while retainer your originals.
Remember to change your import preference settings back to normal!
While discussing tonights U2 concert in Phoenix, I got into a HUGE argument with a Linux user over why amateur musician/producers would have to be mentally challenged for *not* making a Mac their first investment over Linux and Windows. Since the proof is in the ear pudding, I wrote, recorded and mixed this U2-inspired acoustic/vocal jam (aka “rip off”) in 4 hours using only a 2.4GHz MacBook w/4GB RAM, OSX Snow Leopard, GarageBand, *built-in laptop microphone*, iPod earbuds, ghetto-fabulous Fender acoustic guitar and 2 vodka tonics. (In other words no fancy microphones, A/D converters or other hardware.) The noise at the beginning and end is the sound of the MacBooks fan running at full speed, but other than that (and some really sloppy pitch correction patchwork) I’m not aware of any software that ships with Vista, 7, or any modern Linux distribution that can do anything REMOTELY close out of the box in more-or-less the same amount of time. If you think otherwise, prove me wrong!
(Truthiness: I cheated *slightly* by jumping into Logic Pro 9 for the pitch correction part since I was lazy and didn’t want production to take more than 30 minutes, but that wasn’t technically necessary!)
My alt. rock band–currently going by Vic Lee And The Whiskey Three–is rehearsing to put together an EP-length studio demo. We practiced in my living room today and decided to let GarageBand run during a few song run-throughs. This is a raw-off-the-fretboard, completely unedited practice take of one of them… hope you enjoy the sneak preview!
Here’s three original songs from a small set I played a few weeks ago with some friends. If you’ve ever wondered if there is a connection between alcohol consumption and complete loss of control over your vocal chords, behold: undeniable scientific proof. Soooooo, let’s just ignore the crappy parts, mmkay? 🙁
When I built the $1000, 2TB file server, the on-board nVidia HD audio support of the Asus M2NPV-VM motherboard didn’t work out of the box. It’s a trivial fix using the recently open sourced OSS drivers from 4Front Technologies. (I also tested a Creative Audigy 2 PCI sound card using these drivers under Solaris 10 11/06, and the playback worked just as well.)
*** Scanning sound adapter #-1 ***
/dev/oss/hdaudio0/pcm0 (audio engine 0): nVidia HD Audio play-front output
Note! Device is in use (by PID 0/VMIX) but will try anyway
– Performing audio playback test…
OK OK OK
/dev/oss/hdaudio0/pcm1 (audio engine 1): nVidia HD Audio play-side output
– Performing audio playback test…
OK OK OK
/dev/oss/hdaudio0/pcm2 (audio engine 2): nVidia HD Audio play-center/LFE output
– Performing audio playback test…
OK OK OK
/dev/oss/hdaudio0/spdout0 (audio engine 3): nVidia HD Audio spdif output
– Performing audio playback test…
OK OK OK
/dev/oss/hdaudio0/pcmin0 (audio engine 4): nVidia HD Audio record input
– Skipping input only device
Lala.com is an online service for trading physical discs. After entering information on your current CD collection, what CDs you want, and receiving a free shipping kit of envelops and plastic disc carriers via postal mail, you simply start sending discs out as they are requested. Other users do the same, and the system handles the logistics and billing. You may start sending out CDs as soon as you receive the shipping kit to build trading credits, even if you do not yet have discs in your want list. Your credit card is automatically charged a total of $1.75 per CD you receive on a monthly basis.
I’ve been using it for months now and over 20 trades, and am pleased to report near complete success. On one occasion I did not receive a disc, but this was easy to report. I was never billed for the missing disc and never had to deal with the supposed sender personally. Overall I’ve had a pleasant experience and would recommend it to anyone looking to trade CDs with a minimum of hassle.
Update 1: Check out “Making Friends With Some Guy Named Mike” on this band page of mine for an awesome example of this studio in action.
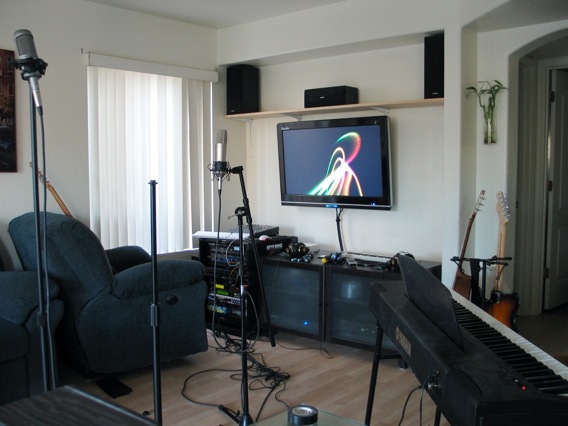
20 years ago digital home recording wasn’t plausible. 10 years ago we started to see its potential, but most hobbyists (read: very cash-limited people) were limited to using still-primitive versions of multi-trackers such as Cakewalk, Cool Edit Pro or Cubase with either COTS Sound Blaster PCI cards or ridiculously over-priced, high-noise, high-latency specialty cards with break-out boxes such as the Lexicon Core 2. Running on Windows 95 or 98, we regularly struggled with the stability of the platform and device drivers. Today, you can have your own personal studio capable of producing DVD-quality recordings by adding a thousand dollars of equipment to your existing computer and music rig. Here’s my living room/home theater/recording studio/Mac haven, all driven by a single Mac Mini..
Here’s are the core components..
Mac Mini (Intel).
Big 1080p LCD television/monitor. The Mac Mini drives this beast with a DVI-to-HDMI converter cable.
Logic Pro (Apple’s recording software). For my needs, it’s really either Logic Pro or Pro Tools. For various reasons I’ve stuck with Logic Pro run in a distributed manner with other Macs in the house using built-in Xgrid functionality over gigabit ethernet.
Headphone amp w/studio headphones. You need at least one good headphone set to properly lay down track on top of track, but when you have people over you can usually get by with three or four. This is too much load to be powered directly by the computer, so the dedicated headphone amp is necessary. I have a Behringer HA4700. (I didn’t want to add my Event 20/20 references monitors to the already cluttered layout, so I have them in another room.)
PreSonus FirePod. This is a truly outstanding input device for recording the entire band simultaneously. The unit is rack-mountable, connects via FireWire and optical cables, and has pristine noise-free pre-amps.
Microphones and stands.
Instruments. I have a full-size Yamaha keyboard (pictured), a bunch of vocal mics and guitars, and a rack of mediocre analog schwag. BYOI, whatever ‘I’ happens to be.
If you’ve already got a Mac setup and some music equipment, grabbing Logic Express, PreSonus FirePod, decent vocal mic and a bunch of cables for $1K will turn your system into an audio powerhouse which your friends will envy.


 Lala.com